So now that you know how to embroider by hand.
Want something fun to put it on?
Then let's get started with my Child's Apron Tutorial!
Want something fun to put it on?
Then let's get started with my Child's Apron Tutorial!
A homemade apron would be the perfect addition to make baking with your little helper that much sweeter. Seriously, the cuteness factor of these is just too high to miss out on. And they are really quite simple to make. Even if you don't want to tackle the embroidery part, just find some gorgeous fabrics and you're good to go.
Finished size of this apron is approximately 10"H x 12"W
You'll need:
- Coordinating fabrics: 1/3 yard of white Egyptian cotton, or other fine white fabric for the top and lining. A coordinating fabric for the back that measures at least 12"H x 16"W (you can use a fat quarter for this). 1/6 yard of coordinating fabric for the sash (a strip of fabric 6"x the standard width of the fabric, about 44"). If you are having this cut at a fabric store, you better ask for 8" because sometimes they can be really off from the grain. but if you are cutting from your stash, you'll need to cut two 3" wide strips of fabric. It would be fun to choose a different print for each piece.
- Ric rac or bias tape (self-made or store-bought) for trim.
- Coordinating thread
- Wrapping paper to make a pattern. Of course any paper will do, but who doesn't have wrapping paper on hand?
Here is my apron pattern. Lovely isn't it? It's been used a million and one times and has the pin holes to prove it. You could also use Swedish Tracing Paper, which I have since switched to. I love this stuff for tracing all of my pattern pieces on to. They are so much more durable and it sticks nicely to the fabric for less slippage.

I started by cutting a rectangle that was 13"W x 10"H. Then I used the lid of a gallon ice cream bucket (which aren't really gallons anymore, so sad) to draw the curved corner. I then folded it in half and cut the curves out so it would be symmetrical. That's it!
Step 2 {Cut your fabric}
You can either pin your pattern piece and cut out 2 pieces from your white fabric (one for the top to embroider on, and one for the lining to give the apron more weight and so that your backing fabric won't show through to the front) and one out of your fabric for the reverse side. Cut 3 total.
Or...you could just raid your pantry. Don't laugh, I know this looks strange, but it works.

My sewing buddy, Amy, showed me last week how to cut pattern pieces out using a rotary cutter. And here I thought rotary cutters were just for straight lines. Nope! Just use something to weigh down the corners. Keep cans/jars on the shorter side or you'll have trouble reaching around them. You can also buy pattern weights that are just large heavy washers wrapped in fabric (or make your own). Make sure you do this on your cutting mat. I thought it would be difficult to maneuver, but it was actually quite easy. You should try it sometime. Just don't forget when it comes dinner time, that what you're looking for might be in your sewing room instead of the pantry. Right Amy? ;) Hehehe.
Next cut two, 3" long strips (by the entire width of the fabric) of your sash fabric. Fabric is usually 44" wide and this is plenty long enough for a child's waist.
*If you would like to make this for an adult, just scale your pattern piece up. Make it a couple of inches wider than your body width (for gathering) and as long as you like. You can add length to the sash by following Jona's tutorial on how to make a fat quarter apron. I'm using her technique for attaching the sash anyway (my old way was much harder), so you might want to read her whole tute too.
Step 3 {Embellish}
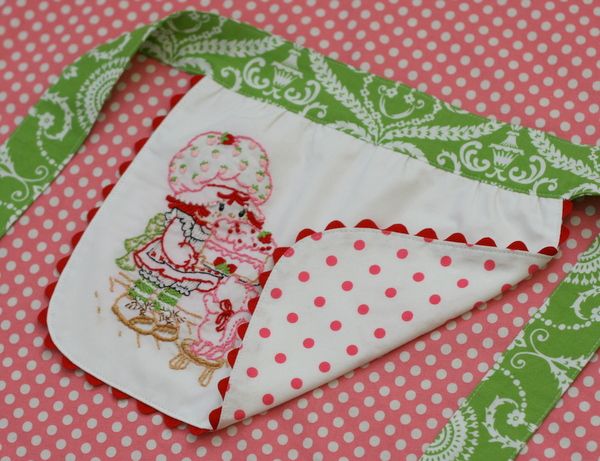
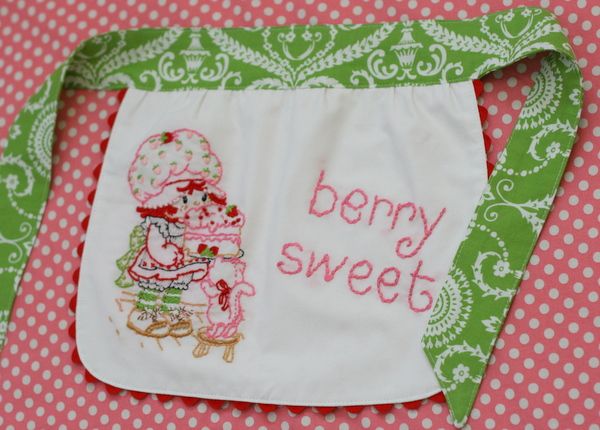
Or not. You can hand embroider a design, applique a monogram, bring the top piece to a store that does machine embroidery to add a name or monogram, or add a pocket to the front of the apron. How about embroidery on the front and a pocket on the back? Or make some yo-yo's, stitch them on and then free-hand embroider the stem and leaves. The sky's the limit. Here are some photos for inspiration. These are all from my past creations.


Bias trim instead of ric rac.

My first apron, it wasn't gathered at all. I prefer it gathered a bit now so it doesn't make the dress lay so flat.


Once you have added all that you want, to the front and back pieces, you are ready to assemble the apron. Start by laying your back piece right side up. If you'd like to sandwich ric rac between the layers start by pinning it along the edges of the fabric (or use my "no pin" method for adding ric rac, found here). Since jumbo ric rac is 3/8" to the center you will use a 3/8" seam allowance for sewing this portion together. This allows you to pin the ric rac right up to the edge of the fabric, no measuring needed. Love that! Of course you can use different sizes of ric rac, but then you'll need to measure so the center will end up on your seam line.
Actually, before you start pinning...you will need to measure to see that it starts 1/2" down from the top so that one of the scallops aren't sewn in half when adding the sash later. I say 1/2" because we'll use a 1/2" seam allowance when we attach the sash. Ric rac is somewhat easy to fudge with. When you get to the other side and it doesn't line up to be 1/2" down from the top just remove some pins (to about the halfway point) and stretch or scrunch it up a bit until you get the correct length. But it's not the end of the world if you have to cut it just short of the top edge and not include the scallop that would have been sewn in half. If you need to do this, then be sure to heat seal the ends so it doesn't come unraveled.
Heat sealing ric rac: Pass a lighter (I use the long handled kind) quickly along the freshly cut ends to melt them together. A little practice and you will become a pro at it.
Now sew it using a 1/4" seam allowance. This is just to keep it in place so you don't have to sew over extra pins when sewing all three layers together. You don't want to sew with the 3/8" allowance here or you might end up with stitches outside of the final seam and that can be unsightly and a pain to remove later.

Now you are ready to make your sandwich of apron pieces.
- First, lay down the plain white piece you are using as the lining. It's ok to not line your apron if you don't mind the print from either side showing through. Perhaps you've just chosen two bold prints, then you probably don't need a lining. It's up to you, this is just how I like to do it.
- Next, place the front of your apron, face up, on top of the lining piece.
- Finally, lay the back piece, wrong side up, on top of your front piece.
You'll also want to check one last time to make sure you've layered them correctly. It's not fun to find out later that your front piece ended up as the lining piece. Yeah, I would know.

You'll notice that when I opened it up that you can see that the lining piece (which is on the bottom) will be directly adjacent to the front piece. This is so that the red ric rac has another layer of white on top of it so it won't be visible through the top layer.
*Of course you could finish you edges differently, like with store-bought or self-made bias tape. I did that in my Sweet Tweet finished apron above^. In that case you would layer your three pieces the way they will lay as a finished product and just wrap your bias tape around the edges. Be sure to put the side that is slightly wider, on the backside. That makes sure it gets caught up in the line you sew from the front side.
Now sew all three layers together using a 3/8" seam allowance and turn it rightside out.

Check to make sure that the ric rac looks good, not spots where it's not sticking out far enough or sticks out too far. You can adjust those now with your seam ripper and extra pinning in that one spot. Just undo as little as possible to be able to reposition the ric rac. It's a pain, but now's the time to do it.
Next you'll iron it so it lays flat. I gently pull on the ric rac to help it pop out and so I don't iron a crease into the edge.
Then you are ready to top-stitch it. Sew a line anywhere from 1/8" to 1/4" from the edge. Just make it even all the way around.

Step 5 {Add the Sash}
You should already have two 3" wide, long strips of fabric cut. You are now ready to attach them to the apron for a sash. This sash will just be long enough to tie in a loose knot behind her. It probably won't be long enough to tie in a bow, but if that's what you prefer you can add length by following Jona's Apron in an Hour tutorial for the sash. I use the same concept here, but with one length of fabric. With hers you can customize it to the length you need.
I start by finding the middle point of both the sash and the apron and use pins to mark those spots.

Laying the pieces right sides together and the sash so the print is upside down, I pin the apron to the bottom edge of the sash, lining up the center point pins. Ok, I'm sure that's confusing. Keep reading, I think it will make sense soon. I hope...

I only want a slight gather for the apron so that all of the embroidery will show. If you gather it too much, then you lose the ability to see all of the design. I slide the outside edges toward the center by one inch and pin it.

Then I find each center point from there on and pin it.

Flip the apron up so you have an idea of what it will look like when sewn together. Looks good to me!
Now go stitch down the gathered apron to the sash with a 1/2" seam allowance. Lay it back down so both the apron and the sash are facing up (like this next photo).

You can now lay your second sash piece on top of the first sash piece. Be sure it's faces right side down and that the print is upside down. In this next photo, the apron is already attached to the bottom edge of the sash piece that is underneath the top piece.

Now you can start stitching around the sash with a 1/2" seam allowance. You will start where the apron sticks out and go all the way around until you get to where it sticks out on the other side.
Start here.

When you get to the corners, measure 2.5" out and sew on an imaginary diagonal line. Or you could just sew them straight.

Clip your corner and trim the excess to make turning the corners easier.

Turn the sash ends right side out and iron them flat.

Now you can start stitching around the sash with a 1/2" seam allowance. You will start where the apron sticks out and go all the way around until you get to where it sticks out on the other side.
Start here.
When you get to the corners, measure 2.5" out and sew on an imaginary diagonal line. Or you could just sew them straight.
Clip your corner and trim the excess to make turning the corners easier.
Turn the sash ends right side out and iron them flat.
The front of the apron already looks like this.

But the back, needs to be stitched up. You need to fold under and iron, a 1/2" seam allowance along the opening.

Pin it lightly so the edge doesn't flip under when you sew. You'll want to remove the pins as you get to them though.

Now, go ahead and top-stitch a line all the way around the apron, about 1/8" to 1/4" from the edge. Just make sure it's even all the way around.
And you are done!
Now go bake a cake!


4 comments:
I LOVE the "ice cream gallon" corners - just the excuse I need to go buy a gallon HA, HA, HA! I loved learning how to gather the apron too! And did I read that right, the Christmas apron was your first one????? WOW!
I just cleaned out 6, yes 6 tubs of clothes, for a Reruns sale but could not bear to part with any of our TaDa. There is always that chance the third child could be a girl... :)
Lance is out of town for work for a couple of days so us girls are tackling a couple of projects - maybe this will be one of them! Actually, I better get a-sewing on that dress or all the little pumpkin will have to wear for her party is one cute apron!!!
You did a really great job with your tutorials!! You make me want to go sew a cute little apron!! I have dusted off my sewing machine, so maybe I will :-)
Love it! Do you take orders for the strawberry shortcake embroidery? :) There is only one part I am a little confused on....Do you sew the front sash piece to the front of the apron with the right sides facing each other before placing the back sash piece on top?
I shudder to think of how much ice cream we eat around here. I save the buckets to use for storage and they are in practically every closet.
Good question Amber, that's exactly the spot I was missing photos for. I just updated the tutorial so it reads better. You are correct. Right after you pin the apron to the sash, you need to sew it to the sash with a 1/2" seam allowance. Then lay it back down (face up) with the sash flipped up so you see the right side of the sash too. Then, lay the back sash piece on top, right sides together. Sorry that was confusion, I was missing that step. Thanks for letting me know!
Post a Comment